Creating a static website using Hugo and hosting it using GitHub Pages
Summary. This report summarises the process of creating a static website using Hugo and then hosting it using GitHub Pages. The purpose of the webpage is to allow the user to i) give a brief summary of his/ her background and ii) provide a list of links showing projects they have been involved with. To this end, modifications are made to a default bootstrap template to allow the website to meet these requirements. DocOnce is used to create individual project reports. The website is then hosted through GitHub Pages.
Skills used:
- Web Development (Hugo).
- Document Preparation (DocOnce, \( \LaTeX \), markdown).
- Version Control/ Hosting (GitHub Pages).
Introduction
The project is broken down into three main sections below:
- Setting up the design of the webpages within Hugo.
- Using DocOnce to create the individual project reports.
- Hosting the webpage on GitHub Pages.
Setting up the design of the webpage
Hugo Installation and structure
Hugo [1] is a fast static site generator written in Go. There are various methods to install it depending on operating system and choice. In this case, it was installed using the snap package
sudo apt-get install hugo
The univeral theme was chosen and cloned using
git clone https://github.com/devcows/hugo-universal-theme
into a directory named themes. For any given file, data entry etc, Hugo will first look in the current project folder and then in the folders listed in the current projects .toml configuration file in the variable 'themes'. This way modifcations can be made to the original template by copying and modifying files in the projects directory, then if anything is not found, the original provided by the theme is looked for in the appropriate place (by default the themes directory).
Figure 1: Overall folder structure
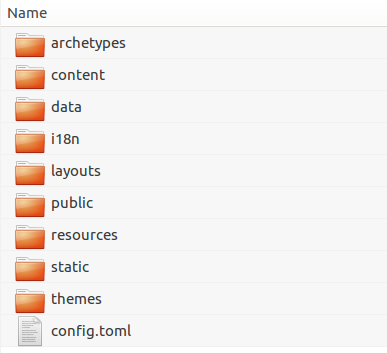
The overall structure of the folders is shown in Figure 1. The main configuration file is the config.toml file. Individual projects or blog listings go in the content directory. Much of the html design of the layout of the webpage itself is defined in the layouts folder. Images for the wepage and individual projects/ blog posts are stored in the static folder. Text associated with the carousel entries is defined in individual .yaml files within the data folder.
Modifications
Several changes were made to the original webpage design including:
- the carousel entries images and text. These are stored and were changed in the locations described previously.
- the carousel background image. Stored in image folder described above.
- the universal logo at the top left of the home page (removed from /layout/partials/nav.html and added title in config.toml)
- removing features under carousel on main page (main config.toml settings)
- changing Contact to About and Blog to Projects (main config.toml settings)
- labelling projects with Skills as well as catgeories (main config.toml settings and added new variable skillsname to copied i8n from default).
- placing social media links at top of main page and others. Removing header with title on each sub page (reordering/ editing /layout/partials/ defined in /layout/single/index.html and /layout/default/list/single/html).
- changing the color of the carousel (main config.toml settings).
Figure 2: Front page before (left) and after (right) modifications.

The blog/ projects page before and after is shown in Figure 3.
Figure 3: Blog/Projects page before (left) and after (right) modifications.

A convenient way to develop the webpage is using the command
snap run hugo server -w
Using this Hugo runs a web server while at the same time looking out for changes within the following parts of the project
/static/*
    /content/*
    /data/*
    /i18n/*
    /layouts/*
    /themes/<CURRENT-THEME>/*
    config
Each time a change is made, Hugo rebuilds the website and continues to serve it on the webserver.
Generating the website for publishing
In order to publish the webpage on a webserver, it has to be built. By default, this is done into the /public directory using the command.
snap run hugo --theme=hugo-universal-theme
Blog/project posts using DocOnce
DocOnce
DocOnce [2] is described by its author as a 'modestly tagged (Markdown-like) markup language'. It offers lots of features including:
- robust support for mathematics and code.
- inbuilt support for referencing using the Publish format.
- inbuilt referencing of equations, figures, tables and sections.
- support for creating multiple document types and formats (i.e. presentations or reports in pdf, html and others) from a single DocOnce source.
- inbuilt support for converting Jupyter notebooks to DocOnce, allowing for production of presentations and reports in all of the supported formats.
Basic usage
The following command converts a Jupyter notebook Template.ipynb to DocOnce source.
doconce ipynb2doconce Template.ipynb
From here the DocOnce source can be converted in multiple output formats. For conversion to html using the 'cosmo' Bootswatch style the following would be used.
style=bootswatch_cosmo

doconce format html Template --html_style=$style --pygments_html_style=default --html_admon=bootstrap_alert --html_output=report_${style} --keep_pygments_html_bg --html_code_style=inherit --html_pre_style=inherit

doconce split_html report_$style.html
Modifications
Combining images into one
It is easier to combine multiple images into one if figures with subfigures are required. To do this use montage
montage input_1.png input_2.png -trim -mode concatenate -tile 2x1 output.png
Image output
The following format is required in Jupyter notebook markdown cells for images to display correctly in the output html. This can be done using a function.
<!-- dom:FIGURE: [./figures/FIG_NAME.png, width=1200] Caption Here. <div id="fig:./figures/FIG_NAME"></div> -->
        <!-- begin figure -->
        <div id="fig:./figures/FIG_NAME"></div>

        <p>Caption Here.</p>

        <img src="./figures/FIG_NAME.png" width=1200>
        <!-- end figure -->
Hosting the webpage on GitHub Pages
The main steps to hosting the Hugo website on Github Pages [3] are:
- Setup a new GitHub repository with name USERNAME.github.io.
- Prepare Hugo (or other) website locally and commit to this GitHub repository.
snap run hugo

cd public/

git init

git add .

git commit -m "First commit"

git remote add origin git@github.com:USERNAME/USERNAME.github.io.git

git push -u origin master
- Add file named CNAME to repository for setup of custom domain. Add the website domain to this.
- Configure DNS for custom domain. The exact steps to follow here will depend on the DNS provider and type of domain. However, the basic procedure requires a record be created that points to the default pages domain (i.e. USERNAME.github.io).
Bibliography
- B. Pedersen and S. Francia. Hugo: The worlds fastest framework for building websites., hugo, 2018.
- H. P. Langtangen. DocOnce: Lightweight markup language. Document once, include anywhere., doconce, 2018.
- C. Wanstrath and P. H. a. T. Preston-Werner. Github Pages: Websites for you and your projects., github, 2018.